Video Coming Soon...
29: Rogue Part 2: Pathing Enemies
WARNING This exercise is in DRAFT status, so there may be errors. If you find any, please email me at help@learncodethehardway.com so I can fix them.
In this exercise you will use Dijkstra's algorithm to create a pathing map to the player. All of the enemies can use these paths to aim for the player and chase them down, but you'll also add the concept of a "hearing distance" to enemies. This will make them "wake up" when the player gets too close, and also sometimes forget if the player can get away.
About Dijkstra's Algorithm
Dijkstra's Algorithm is called a "shortest path algorithm" that will calculate the distance from every cell on the grid to any number of other targets. You give it an input grid, the target grid, and it walks the grid efficiently calculating the distances to the targets.
Here's an example of what Dijkstra path numbers look like:
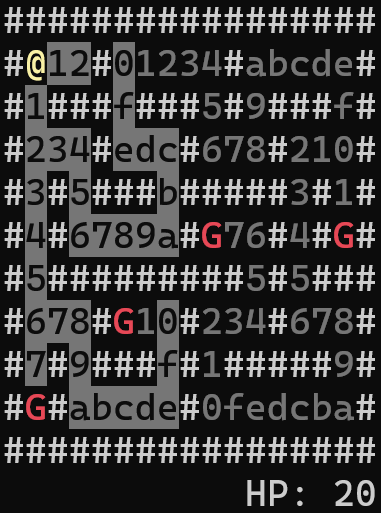
In this example you can see multiple enemies (red G) and the numbers on the floor are how many squares they are from the player (yellow @). This is done once for all of the enemies and all of the targets on the map.
Fun Dijkstra Tricks
Dijkstra's Algorithm is a nearly perfect algorithm for this kind of game. It's not the fastest when you need to find a path from one point to another, but Dijkstra's can make paths to multiple points in the same time as a single point. That's its main super power in a game like Rogue.
You could have an enemy that wants to either attack the player or gather gold. In that case you'll only need to place those targets into the input map, run Dijkstra's once, and the paths are set. Once you have your paths calculated then the enemy simply moves to the nearest neighbor that is lower than their current position.
This also means that you can have many enemies all with pathing numbers to the player done in one algorithm. With many other algorithms you'd need to calculate pathing from the player to each enemy in turn. With Dijkstra's you just do one big run with the player as target and done.
main.go Changes
As with the previous exercise, you set up the work for this exercise by adding it to the main.go:
View Source file curse-you-go-rogue/03_pathing_enemies/main.go.diff Only
--- 02_mazes_and_enemies/main.go    2025-10-06 11:53:40.243831800 -0400
+++ 03_pathing_enemies/main.go  2025-10-06 11:53:48.238068700 -0400
@@ -13,4 +13,6 @@

   for game.HandleEvents() {
+    game.CalculatePaths()
+    game.EnemyPathing()
     game.Render()
   }
These functions will be available in pathing.go at the end.
data.go Changes
The pathing.go code needs some new data, so you add a few things to the data.go file:
View Source file curse-you-go-rogue/03_pathing_enemies/data.go.diff Only
--- 02_mazes_and_enemies/data.go    2025-10-06 10:40:57.847195400 -0400
+++ 03_pathing_enemies/data.go  2025-10-06 02:44:43.658927000 -0400
@@ -11,9 +11,10 @@
   RENDER = true
   SHOW_RENDER = false
-  SHOW_PATHS = false
+  SHOW_PATHS = true
   HEARING_DISTANCE = 6
 )

 type Map [][]rune
+type Paths [][]int

 type Position struct {
@@ -31,4 +32,5 @@
   Screen tcell.Screen
   Level Map
+  Paths Paths
   Player Enemy
   Status string
- Change the
SHOW_PATHStotrueso you can see the paths while you develop. - Create a
type Pathsthat's just a grid ofint. - Add a
Paths Pathsto theGamestruct, but maybe that's not a good name? I'm too lazy to fix it though so you decide.
debug.go Changes
To visualize the pathing numbers we'll need a new DrawPaths() function:
View Source file curse-you-go-rogue/03_pathing_enemies/debug.go.diff Only
--- 02_mazes_and_enemies/debug.go   2025-10-06 01:05:42.441647100 -0400
+++ 03_pathing_enemies/debug.go 2025-10-05 23:47:48.686143800 -0400
@@ -4,4 +4,6 @@
   "log"
   "os"
+  "fmt"
+  "github.com/gdamore/tcell/v2"
 )

@@ -13,2 +15,19 @@
   dbg = log.New(out, "", log.LstdFlags)
 }
+
+func (game *Game) DrawPaths() {
+  for y, row := range game.Paths {
+    for x, path_num := range row {
+      if path_num == PATH_LIMIT { continue }
+
+      as_str := fmt.Sprintf("%x", path_num % 16)
+      style := tcell.StyleDefault.Foreground(tcell.ColorGray)
+
+      if path_num >= 0 && path_num <= 16 {
+        style = style.Reverse(true)
+      }
+
+      game.Screen.SetContent(x, y, rune(as_str[0]), nil, style)
+    }
+  }
+}
game.go Changes
In the NewGame() function you need to create the game.Paths along with the other variables.
View Source file curse-you-go-rogue/03_pathing_enemies/game.go.diff Only
--- 02_mazes_and_enemies/game.go    2025-10-06 10:40:37.923662000 -0400
+++ 03_pathing_enemies/game.go  2025-10-06 12:44:21.971080300 -0400
@@ -13,4 +13,5 @@
   game.Enemies = make(map[Position]*Enemy)
   game.Level = make(Map, height, height)
+  game.Paths = make(Paths, height, height)
   game.Player = Enemy{20, Position{1,1}, 4}
map.go Changes
You'll also need a way to clone a map so add a CloneMap() function to map.go:
View Source file curse-you-go-rogue/03_pathing_enemies/map.go.diff Only
--- 02_mazes_and_enemies/map.go 2025-10-06 23:33:02.887088700 -0400
+++ 03_pathing_enemies/map.go   2025-10-06 10:44:52.350308600 -0400
@@ -14,4 +14,16 @@
 }

+func (game *Game) CloneMap() Map {
+  // this is a shallow copy though
+  new_map := slices.Clone(game.Level)
+
+  for i, row := range new_map {
+    // this makes sure the row is an actual copy
+    new_map[i] = slices.Clone(row)
+  }
+
+  return new_map
+}
+
 func (game *Game) Inbounds(pos Position, offset int) bool {
   return pos.X >= offset &&
movement.go Changes
Then we'll need a way to move enemies when its their turn to move:
View Source file curse-you-go-rogue/03_pathing_enemies/movement.go.diff Only
--- 02_mazes_and_enemies/movement.go    2025-10-06 10:48:12.166620400 -0400
+++ 03_pathing_enemies/movement.go  2025-10-06 12:00:47.091211600 -0400
@@ -11,2 +11,10 @@
   }
 }
+
+func (game *Game) MoveEnemy(from Position, to Position) {
+  enemy, ok := game.Enemies[from]
+  if !ok { dbg.Fatal("no enemy at", from, "wtf") }
+
+  delete(game.Enemies, from)
+  game.Enemies[to] = enemy
+}
To "move" an enemy I'm actually deleting it from the game.Enemies map and then adding it back in at the new position.
ui.go Changes
The last of our little changes is to add in the game.DrawPaths() to visualize the paths while we work:
View Source file curse-you-go-rogue/03_pathing_enemies/ui.go.diff Only
--- 02_mazes_and_enemies/ui.go  2025-10-06 11:18:20.691714300 -0400
+++ 03_pathing_enemies/ui.go    2025-10-06 12:10:53.153215100 -0400
@@ -68,4 +68,9 @@
   game.Screen.Clear()
   game.DrawMap()
+
+  if SHOW_PATHS {
+    game.DrawPaths()
+  }
+
   game.DrawEntity('@', game.Player.Pos, tcell.ColorYellow)
New pathing.go
Finally, for the new code, the actual Dijkstra's Pathing algorithm:
View Source file curse-you-go-rogue/03_pathing_enemies/pathing.go Only
package main

import (
  "slices"
)

func (game *Game) FillPaths(target Paths, setting int) {
  for y := 0 ; y < game.Height; y++ {
    target[y] = slices.Repeat([]int{setting}, game.Width)
  }
}


func (game *Game) PathAddNeighbors(neighbors []Position, closed Map, near Position) []Position {
  points := compass(near, 1)

  for _, pos := range points {
    // NOTE: if you also add !game.Occupied(pos.x, pos.y) it ????
    if closed[pos.Y][pos.X] == SPACE {
      closed[pos.Y][pos.X] = WALL
      neighbors = append(neighbors, pos)
    }
  }

  return neighbors
}

func (game *Game) CalculatePaths() {
  in_grid := make([][]int, game.Height, game.Height)
  game.FillPaths(in_grid, 1)
  in_grid[game.Player.Pos.Y][game.Player.Pos.X] = 0

  game.FillPaths(game.Paths, PATH_LIMIT)
  closed := game.CloneMap()
  starting_pixels := make([]Position, 0, 10)
  open_pixels := make([]Position, 0, 10)

  counter := 0

  for counter < game.Height * game.Width {
    x := counter % game.Width
    y := counter / game.Width

    if in_grid[y][x] == 0 {
      game.Paths[y][x] = 0
      closed[y][x] = WALL
      starting_pixels = append(starting_pixels, Position{x, y})
    }

    counter += 1
  }

  for _, pos := range starting_pixels {
    open_pixels = game.PathAddNeighbors(open_pixels, closed, pos)
  }

  counter = 1
  for counter < PATH_LIMIT && len(open_pixels) > 0 {
    next_open := make([]Position, 0, 10)
    for _, pos := range open_pixels {
      game.Paths[pos.Y][pos.X] = counter
      next_open = game.PathAddNeighbors(next_open, closed, pos)
    }
    open_pixels = next_open
    counter += 1
  }

  for _, pos := range open_pixels {
    game.Paths[pos.Y][pos.X] = counter
  }
}

func (game *Game) EnemyPathing() {
  for enemy_at, _ := range game.Enemies {
    // get the four directions
    dirs := compass(enemy_at, 1)

    // sort by closest path number
    slices.SortFunc(dirs, func(a Position, b Position) int {
      return game.Paths[a.Y][a.X] - game.Paths[b.Y][b.X]
    })

    // 0 dir is now the best direction
    move_to := dirs[0]

    // can we hear the player? occupied?
    can_hear := game.Paths[move_to.Y][move_to.X] < HEARING_DISTANCE
    occupied := game.Occupied(move_to)

    if can_hear && !occupied {
      // move the enemy in the best direction
      game.MoveEnemy(enemy_at, move_to)
    }
  }
}
This code has two main functions:
CalculatePaths()-- The actual Dijkstra Algorithm that calculates the pathing numbers.EnemyPathing()-- The function responsible for calculating where an enemy should move and then updating their position for the next round of rendering.
Once again, I recommend studying the algorithm on paper if you can, and watch the associated video to see me visualize it. You may also use the trick I did in the maze.go where you slow down the pathing algorithm so you can see it.
Register for Learn Go the Hard Way
Register today for the course and get the all currently available videos and lessons, plus all future modules for no extra charge.